

To enable Secure Boot, access the BIOS settings and locate the Secure Boot option. Enable it for enhanced security.
In the realm of cybersecurity, one crucial aspect that should not be overlooked is Secure Boot. By enabling Secure Boot, you can protect your system from unauthorized firmware, bootloader, or operating system modifications. This feature ensures that only trusted software components are loaded during the boot process, safeguarding your system against malware and other threats.
In this blog post, we will delve into the importance of Secure Boot, the steps to enable it, and the benefits it offers in enhancing the overall security posture of your device. So, let’s dive in and explore the world of Secure Boot and how it can bolster your system’s defenses against potential cyber risks.
Introduction To Secure Boot
To enable Secure Boot, access the BIOS settings and navigate to the Secure Boot option. Then, select “Enabled” to activate this security feature, which helps prevent unauthorized software from running during the boot process. This ensures a more secure computing environment by verifying the integrity of the operating system and boot components.
What Is Secure Boot?
Secure Boot is a security feature implemented in modern computer systems, designed to protect against unauthorized software and malware. When enabled, Secure Boot ensures that only trusted and digitally signed software is allowed to run during the system startup process. It provides a secure foundation for the operating system and helps to prevent malicious code from being executed.
Benefits Of Enabling Secure Boot
Enabling Secure Boot on your computer offers several key benefits:
- Enhanced System Security: Secure Boot provides an additional layer of protection against malware, rootkits, and other malicious software. By verifying the digital signatures of the boot components, it helps to ensure that only trusted software is loaded, reducing the risk of unauthorized access and potential security breaches.
- Protection against Bootkits: Bootkits are a type of malware that infects the boot process, making them particularly difficult to detect and remove. Secure Boot helps to prevent the execution of such bootkits by only allowing trusted boot components to run, thereby safeguarding your system’s integrity.
- Prevention of Unauthorized Operating System Modifications: With Secure Boot enabled, any unauthorized modifications to the operating system or bootloader are detected and blocked. This ensures that the system remains in a known, secure state and mitigates the risk of tampering or unauthorized changes.
- Compatibility with Trusted Hardware: Secure Boot ensures that the operating system is loaded on hardware that is known to be trustworthy and has been verified by the manufacturer. This protects against the use of counterfeit or compromised hardware components that could potentially compromise system security.
By enabling Secure Boot, you can significantly enhance the security of your computer system, protecting it against various threats and ensuring a safer computing experience.
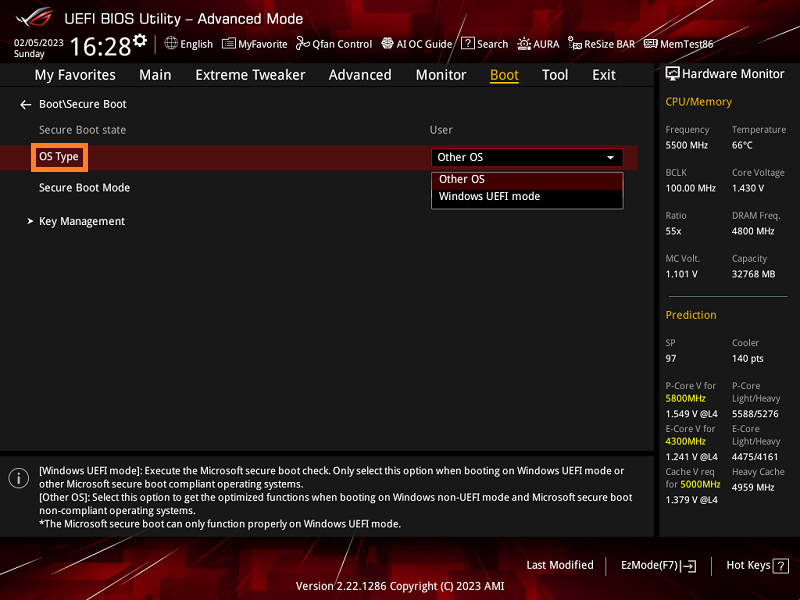
Credit: rog.asus.com
Prerequisites Before Enabling Secure Boot
Before enabling Secure Boot, there are several important prerequisites to consider. Ensuring compatibility, updating your BIOS, and backing up your data are crucial steps to take before making any changes to your system’s security settings.
Checking Compatibility
Before enabling Secure Boot, it’s essential to verify that your system’s hardware and software are compatible with this security feature. Ensure that your computer’s motherboard, firmware, and operating system support Secure Boot.
Updating Your Bios
Updating your BIOS to the latest version is crucial for enabling Secure Boot. Check the manufacturer’s website for BIOS updates and follow the instructions carefully to ensure a smooth and successful update process.
Backing Up Your Data
Prior to enabling Secure Boot, it’s highly recommended to back up all your important data. This will safeguard your files in case any unexpected issues arise during the Secure Boot activation process.
Accessing Your Computer’s Bios Or Uefi Settings
Accessing Your Computer’s BIOS or UEFI Settings is an essential step in enabling Secure Boot. This process allows you to configure the firmware settings of your computer to enhance its security features. Here’s a simple guide to help you access your BIOS or UEFI settings and enable Secure Boot.
Restarting Your Computer
To access your BIOS or UEFI settings, you need to restart your computer. Ensure that all the running applications are closed before proceeding with the restart.
Entering The Bios/uefi Setup
Upon restarting your computer, you’ll need to enter the BIOS or UEFI setup. This is typically done by pressing a specific key or key combination during the boot process. Common keys include F2, F10, F12, or the Delete key. Refer to your computer’s manual or the manufacturer’s website for the exact key to access the BIOS or UEFI setup.

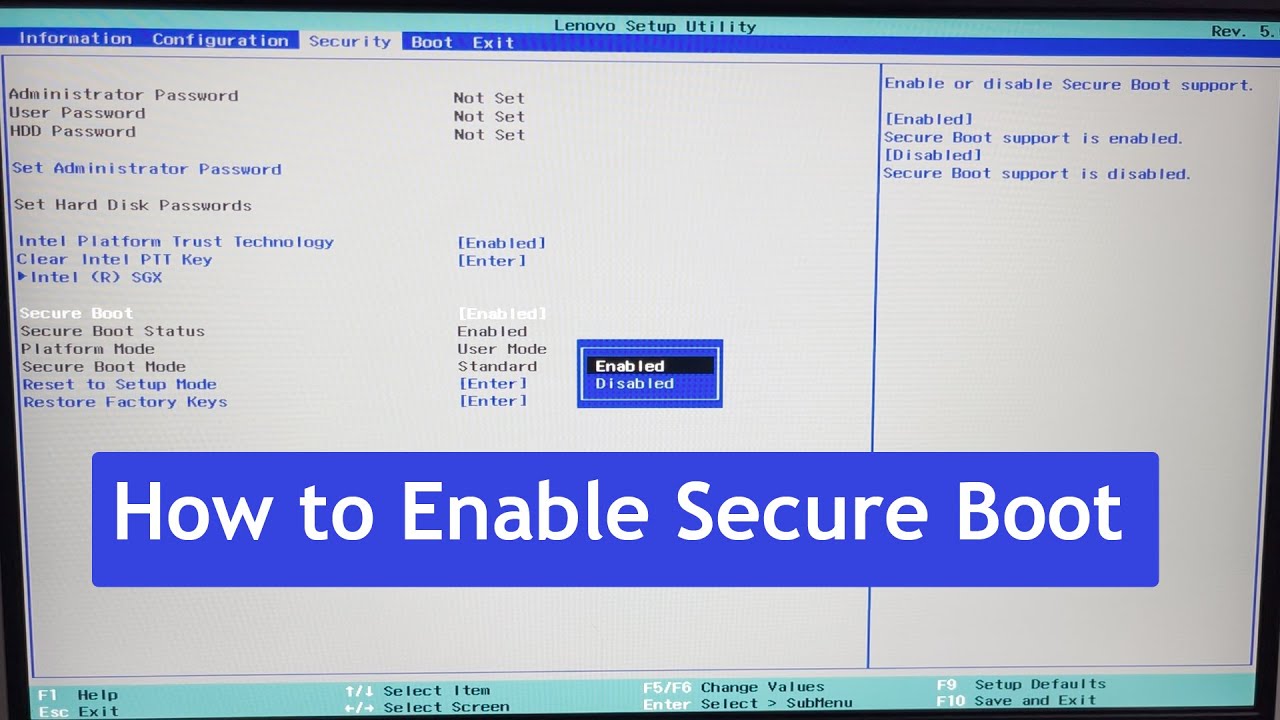
Credit: www.youtube.com
Navigating The Bios/uefi Interface
When it comes to enabling Secure Boot on your computer, one of the essential steps is navigating the BIOS/UEFI interface. This interface allows you to access and modify various settings related to your computer’s hardware. In this section, we will guide you through the process of identifying the Secure Boot option and understanding the layout of the BIOS/UEFI interface.
Identifying The Secure Boot Option
Before you can enable Secure Boot, you need to locate the option within the BIOS/UEFI interface. The exact location of this option may vary depending on the manufacturer and model of your computer. However, you can typically find it under the “Security” or “Boot” section of the BIOS/UEFI menu.
To identify the Secure Boot option, follow these steps:
- Restart your computer and press the designated key to enter the BIOS/UEFI setup. This key is usually displayed on the screen during the boot process and may differ between manufacturers (e.g., F2, Del, Esc).
- Once you are in the BIOS/UEFI setup, navigate through the menu using the arrow keys on your keyboard.
- Look for a section labeled “Security” or “Boot” and navigate to it.
- Within this section, search for an option related to Secure Boot. It might be called “Secure Boot,” “Secure Boot Control,” or something similar.
Once you have located the Secure Boot option, you can proceed with enabling it to enhance the security of your system.
Understanding Bios/uefi Layout
The layout of the BIOS/UEFI interface may vary slightly depending on your computer’s manufacturer. However, understanding the general structure can help you navigate through the settings more efficiently.
Typically, the BIOS/UEFI interface consists of a series of menus and submenus. Each menu represents a category of settings, such as “Main,” “Advanced,” “Boot,” “Security,” etc. To access a particular menu, you can use the arrow keys on your keyboard to highlight it and press Enter.
Within each menu, you will find various options that you can modify. These options are often displayed as a list, with each item representing a specific setting. To modify an option, select it using the arrow keys and press Enter.
Some BIOS/UEFI interfaces also provide additional information or instructions at the bottom of the screen. Pay attention to these details as they can guide you through the configuration process.
Now that you have a basic understanding of the BIOS/UEFI layout, you can confidently navigate through the interface to enable Secure Boot and enhance the security of your computer.
Enabling Secure Boot
Enabling Secure Boot is a crucial step in ensuring the security of your computer’s boot process. By enabling Secure Boot, you can protect your system from unauthorized firmware, operating systems, and bootloaders. This added layer of security helps prevent malware and other unauthorized software from running during the boot process.
Locating The Secure Boot Setting
First, you need to locate the Secure Boot setting in your computer’s BIOS or UEFI firmware. To access the BIOS or UEFI settings, restart your computer and press the designated key during the boot process, typically Del, F2, F10, or Esc. Once in the BIOS or UEFI settings, navigate to the Security or Boot tab to find the Secure Boot setting.
Switching Secure Boot To Enabled
Once you have located the Secure Boot setting, navigate to it and switch it to “Enabled.” This action may require you to select the setting and press Enter or use the designated key to change the option. After enabling Secure Boot, be sure to save the changes before exiting the BIOS or UEFI settings. This ensures that Secure Boot remains enabled when you restart your computer.
Configuring Other Bios/uefi Settings For Secure Boot
When enabling Secure Boot, it’s crucial to configure other BIOS/UEFI settings to ensure optimal security. Let’s explore key settings to enhance Secure Boot protection.
Disabling Legacy Boot Mode
Legacy Boot Mode should be disabled to prevent potential security vulnerabilities.
Adjusting Boot Order
Adjust the boot order to prioritize Secure Boot-enabled devices for enhanced security.
Saving Changes And Exiting Bios/uefi
When it comes to saving changes and exiting BIOS/UEFI, it is crucial to follow the correct steps to ensure a smooth transition. Confirming your changes, restarting your computer, and securely enabling Secure Boot are essential for system security.
Confirming Your Changes
Before exiting BIOS/UEFI, ensure to confirm the changes you have made. Review settings to ensure they are accurate.
Restarting Your Computer
After confirming changes, it is time to restart your computer. Save settings and exit BIOS/UEFI to enable Secure Boot.
Credit: softkeys.uk
Verifying Secure Boot Activation
Ensure the activation of Secure Boot by following these simple steps to enable secure boot on your device. Verify the secure boot activation to enhance the security and protection of your system.
Using System Information
Secure Boot activation can be verified through System Information.Third-party Tools For Verification
Third-party tools provide additional methods to verify Secure Boot activation. To verify Secure Boot activation, follow these steps: 1. Access System Information: Go to the system settings menu. 2. Locate Secure Boot Status: Look for Secure Boot status in the system information. 3. Verify Secure Boot Activation: Ensure Secure Boot is active and running. For more detailed verification, consider using third-party tools such as: – Tool A: Offers in-depth analysis of Secure Boot status. – Tool B: Provides comprehensive verification reports. Utilize these tools for a thorough check of Secure Boot activation.Troubleshooting Common Secure Boot Issues
To enable Secure Boot, troubleshoot common issues by ensuring that the system firmware supports it and that it’s activated in the BIOS settings. Verify the digital signature of the operating system and drivers to resolve any compatibility conflicts and ensure a secure boot process.
Boot Failures After Enabling Secure Boot
Resolving Compatibility Problems
Facing issues after enabling Secure Boot? Let’s troubleshoot common problems. Boot Failures: Check if the OS supports Secure Boot. Compatibility Errors: Update BIOS and drivers for compatibility. Secure Boot Not Enabled: Enable Secure Boot in BIOS settings. Boot Device Not Found: Verify boot order and device connections. Invalid Signature: Ensure signed OS and drivers are used. UEFI/BIOS Configuration: Verify proper settings for Secure Boot. Malware or Virus: Run a full system scan for security threats. Driver Issues: Update drivers to ensure compatibility. Hardware Changes: Revert recent hardware modifications. BIOS Update: Update BIOS to the latest version available. UEFI/BIOS Firmware: Ensure firmware is up-to-date for compatibility. Secure Boot Violations: Monitor for unauthorized system changes. Third-Party Software: Disable any conflicting software. Boot Loop: Check for corrupt system files causing the loop. Secure Boot Keys: Verify and update Secure Boot keys if needed. System Restore: Use System Restore to revert to a stable state. Corrupted Bootloader: Repair or reinstall the bootloader. Hardware Troubleshooting: Test hardware components for faults. Secure Boot Configuration: Review and adjust Secure Boot settings. System Recovery: Use recovery options if boot failures persist.Frequently Asked Questions
How Do I Enable Secure Boot On My Computer?
To enable Secure Boot on your computer, you need to access the BIOS settings and find the Secure Boot option. Once you locate it, you can enable it to ensure that only trusted software can run during the boot-up process.
What Is Secure Boot, And Why Is It Important?
Secure Boot is a feature that ensures only trusted software can run on your computer during the boot-up process. It’s important because it helps protect against malware and other security threats that can compromise your system.
Can All Computers Support Secure Boot?
No, not all computers support Secure Boot. It depends on the hardware and firmware of your computer. Most newer computers support Secure Boot, but if you’re unsure, you can check your computer’s documentation or contact the manufacturer.
How Do I Know If Secure Boot Is Enabled On My Computer?
To check if Secure Boot is enabled on your computer, you can access the BIOS settings and look for the Secure Boot option. If it’s enabled, you should see a message indicating that Secure Boot is active during the boot-up process.
Conclusion
Enabling Secure Boot is an essential step in protecting your system against unauthorized access. With the steps outlined in this post, you can easily enable Secure Boot on your device and enjoy the benefits of a more secure computing environment.
By following the recommended guidelines and staying up-to-date with the latest security updates, you can ensure that your device remains protected from potential threats. Protect your system today by enabling Secure Boot.


